I replaced a bad hard drive with a new one, but the Automatic Rebuild is not triggered by itself. Why is that?
You have to go to RAID MASTER to assign the new hard drive as a ¡§Spare¡¨ under the Advanced Mode Menu. Once it is assigned, the Rebuild process should start. Here is a step-by-step instruction of replacing a new hard drive in an already-existing RAID 5 mode (4 hard drives) when one hard drive has failed:
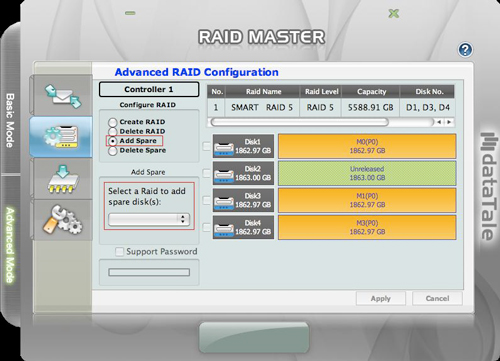
1. Go to the Advanced Mode menu of the RAID MASTER, which should appear similar to this screenshot (3 hard drive already inside the RAID System with one ¡§unreleased¡¨ hard drive).
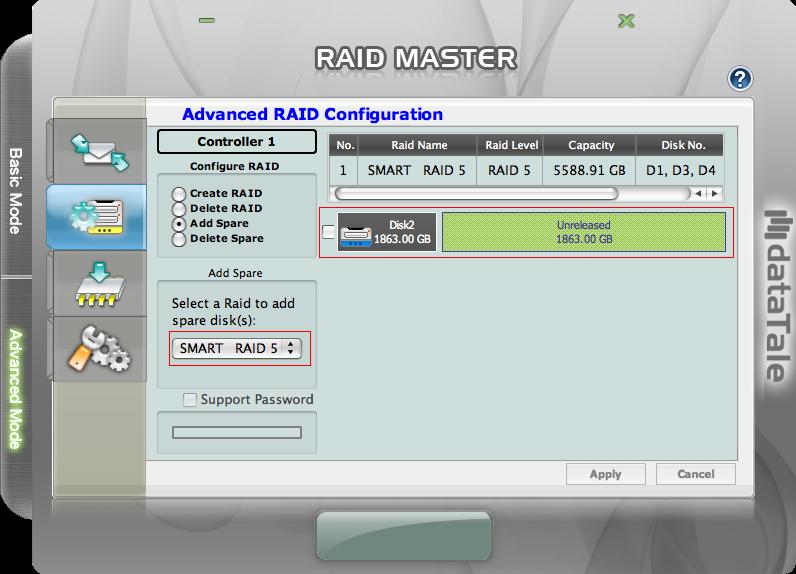
At this point, click on the ¡§Add Spare¡¨ (upper red rectangle) icon. Then, the ¡§Select a Raid to Add Spare Disk(s)¡¨ should appear (lower red rectangle), which an already-existing RAID needs to be selected. Please do so.
2. After selecting the RAID to add the Spare hard drive, the RAID MASTER should appear similar to this screenshot, which is same as Step 1 but with the "unreleased" hard drive as a possible Spare.
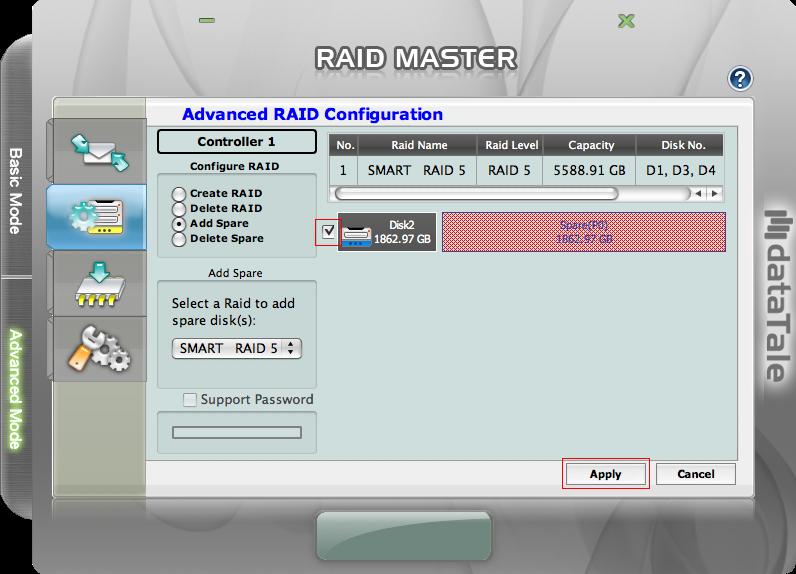
3. Finally, check the box (red rectangle on the screenshot) for the "unreleased" hard drive and click on the "Apply" icon. Once applied, click on the "Yes" icon when the warning confirmation of the RAID MASTER appears (whether a Spare is to be added), and the Rebuild process should start in a short while (which can be confirmed by checking the LEDs status for Rebuilding).
Note: If the ¡§Add Spare¡¨ feature is not available for this particular new hard drive, it is possible that this hard drive have already been configured with another RAID (broken or degraded). Please first go to ¡§Delete RAID¡¨ section of the menu to erase the previous RAID configuration in this new hard drive. Then, the ¡§Add Spare¡¨ feature will become available and simply follow the remaining steps as mentioned above.
1. Go to the Advanced Mode menu of the RAID MASTER, which should appear similar to this screenshot (3 hard drive already inside the RAID System with one ¡§unreleased¡¨ hard drive).
At this point, click on the ¡§Add Spare¡¨ (upper red rectangle) icon. Then, the ¡§Select a Raid to Add Spare Disk(s)¡¨ should appear (lower red rectangle), which an already-existing RAID needs to be selected. Please do so.
2. After selecting the RAID to add the Spare hard drive, the RAID MASTER should appear similar to this screenshot, which is same as Step 1 but with the "unreleased" hard drive as a possible Spare.
3. Finally, check the box (red rectangle on the screenshot) for the "unreleased" hard drive and click on the "Apply" icon. Once applied, click on the "Yes" icon when the warning confirmation of the RAID MASTER appears (whether a Spare is to be added), and the Rebuild process should start in a short while (which can be confirmed by checking the LEDs status for Rebuilding).
Note: If the ¡§Add Spare¡¨ feature is not available for this particular new hard drive, it is possible that this hard drive have already been configured with another RAID (broken or degraded). Please first go to ¡§Delete RAID¡¨ section of the menu to erase the previous RAID configuration in this new hard drive. Then, the ¡§Add Spare¡¨ feature will become available and simply follow the remaining steps as mentioned above.